How To Delete Pages and Posts In WordPress (Easy Steps)

Keeping your WordPress website organized and tidy is essential for a professional online presence.
One of the first steps to achieve this is by deleting default sample pages that come with WordPress installation.
In this blog post, I’ll guide you through the simple process of removing these unnecessary pages.
How To Delete (Sample) Posts
Step 1: Access the WordPress Dashboard
To begin, locate the name of your website at the top left corner of your screen and click on it.
From the dropdown menu, select ‘Dashboard.’ This is where you’ll manage various aspects of your site.
Step 2: Navigate to the Posts Section

In your dashboard, find and click on the ‘Posts’ tab. Here, you will see all the posts created on your website, including the default ‘Hello World’ post.
Step 3: Trash the Sample Post

Locate the post you want to delete and hover over it. Click on ‘Trash’ to move it to the trash bin.
This action doesn’t delete the post permanently but removes it from your active posts list.
Step 4: Permanently Delete the Post

Now, click on the ‘Trash’ tab. Here, you’ll see your trashed posts.
Select it and then click on ‘Delete Permanently’ to completely remove it from your website.

How To Delete (Sample) Pages
Step 1: Go to the Pages Section
After deleting the sample post, move to the ‘Pages’ tab in your dashboard. You’ll see a list of all pages, including a ‘Sample Page.’
Step 2: Trash the Sample Page

Hover over the ‘Sample Page’ title and click on ‘Trash.’ This will send the page to the trash bin, just like the post.
Step 3: Permanently Delete the Page
Finally, click on the ‘Trash’ tab within the Pages section. Locate the ‘Sample Page’ and select ‘Delete Permanently’ to ensure it is fully removed from your site.
How to Bulk Delete Posts in WordPress
Step 1: Accessing the Posts Section
You might have several posts that you no longer need.
To start bulk deleting them, go to your WordPress dashboard and click on ‘Posts.’ This section displays all your current posts.
Step 2: Selecting Posts for Deletion

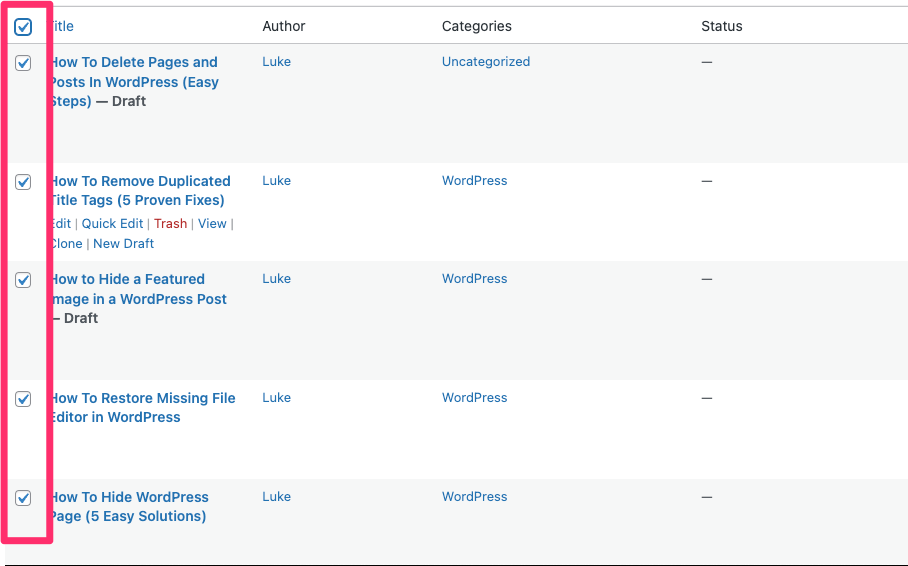
In the Posts section, you’ll see a list of all your posts with checkboxes next to each title.
To bulk delete, start by selecting the posts you want to remove.
If you need to delete all posts, you can use the checkbox in the table’s header to select all posts displayed on the page.
Step 3: Applying Bulk Actions

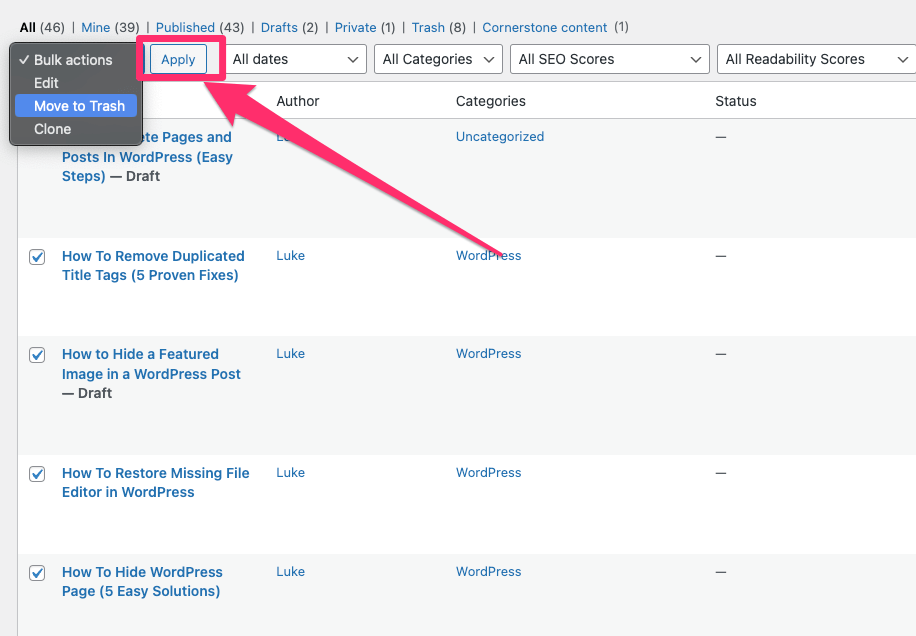
Once you’ve selected the posts, look for the ‘Bulk Actions’ dropdown menu above the post list. Click on it and select ‘Move to Trash.’
Step 4: Confirming the Bulk Deletion

After selecting ‘Move to Trash,’ click the ‘Apply’ button next to the dropdown menu. This action will move all the selected posts to the trash bin.
Step 5: Permanently Deleting the Posts
Remember, moving posts to the trash doesn’t delete them permanently.
To fully remove them, go to the ‘Trash’ tab in the Posts section.
Here, you can either select individual posts to delete permanently or use the bulk actions again to empty the trash entirely.
How to Remove the Blog Roll / Page from Your WordPress Website
Sometimes, a blog doesn’t fit the needs of every website, and you might prefer not to display it. Here’s a step-by-step guide to achieving this.
Step 1: Navigate to “Reading” Settings
In Your Dashboard go to Settings > Reading
Step 2: Selecting a Static Home Page

In the “Your homepage displays” setcion just pick the “a static page” option.
After setting it to a static page, choose which page you want as your home page.
For instance, I’ll name mine ‘Home’ for this example.
Step 3: Removing the Blog Page

For the ‘Posts page’ section (your main blog page), select ‘Select’ at the top of the dropdown list.
This action ensures that no specific blog page is set for your website.
Step 4: Publishing the Changes
Once you’re done with the settings, click ‘Publish’ at the top to save your changes.
Step 5: Deleting Any Existing Blog Page
If your blog posts were displayed on a different page (like a ‘Blog’ page), you’ll need to delete this page. Edit the page and then move it to the trash to remove it from your site.
Step 6: Adding Content to Your New Home Page
Lastly, add content to your new static home page. Edit it like any other page in WordPress to tailor it to your needs.
And that’s it! You’ve successfully removed the blog page from your WordPress website. Remember, even without a blog page, you can still create posts and link them to other pages; they just won’t appear in a dedicated blog section.
Closing Thoughts
By following these easy steps, you can remove any unwanted pages from your WordPress site.
This action helps in keeping your site organized and focused on the content that truly represents your brand or message.
Regularly check your pages and remove any that are no longer needed to maintain a clean and professional website.