How To Organize WordPress Uploads Into Month/Year Based Folders

If you’ve ever navigated through the WordPress admin panel, particularly the media library, you’re probably familiar with its less-than-ideal organization.
Imagine sifting through over 4,000 files in a seemingly endless scroll – it’s overwhelming and, frankly, disorganized.
That’s exactly the challenge I faced until I stumbled upon a solution.
How To Organise Uploads Into Folders

FileBird is a WordPress plugin that introduces a much-needed folder structure to your media library, allowing you to categorize files efficiently.
This neat organization is a stark contrast to the default endless stream of files.
It’s available for free in the WordPress plugin directory, but I opted for the pro version from Envato for $39, which offers lifetime updates and a year of support and is definitely worth it!
Organize Files with Drag and Drop
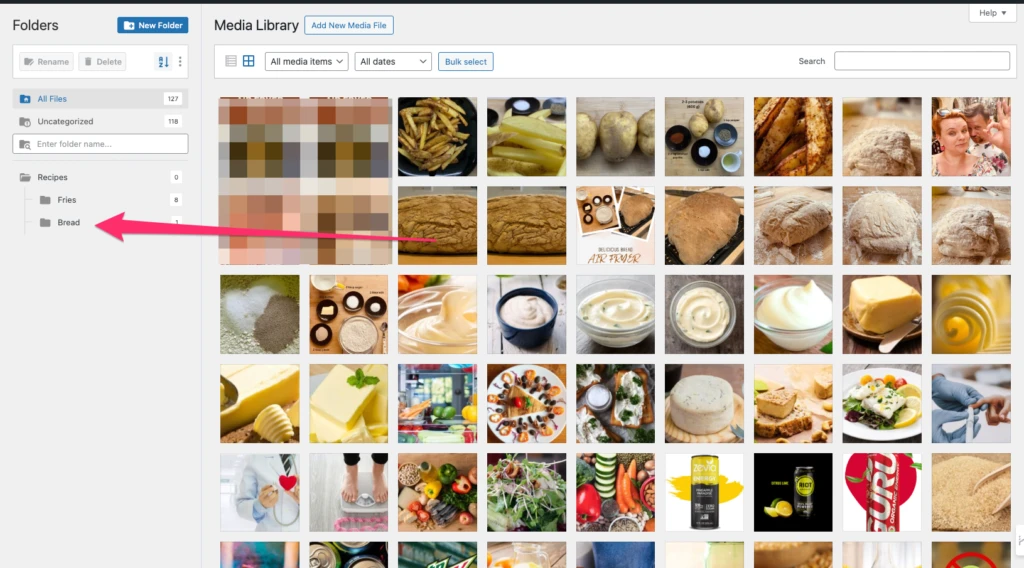
One of the best things about FileBird is that it lets you sort your media files into folders just like you do on your computer.
You can click and drag files into different folders, making it much easier to keep everything organized.
And you can make as many folders and subfolders as you need!
Works Well with Other Tools
FileBird is great because it works with other tools you might be using on your WordPress site, like Elementor, Gutenberg, and WP Bakery.
This means you can easily find and use your images and videos no matter which tool you’re using to build your website.
Experience with FileBird: A User’s Perspective
As someone who has used FileBird, I can tell you that it’s been a game-changer for managing my website.
Before, my media library was a mess, and finding the right image was always a headache.
But with FileBird, I can easily create folders for different projects and categories, making it super simple to find exactly what I need.
Plus, the drag and drop feature feels natural and is easy to use, even if you’re new to WordPress.
Extra Cool Features in Pro Version
If you choose the Pro version of FileBird, you get some extra features that are really handy.
You can change how your folders look, download entire folders at once, and even sort your files by size.
This is great for keeping your website neat and organized, especially if you have a lot of files.
Here are my favourite features of the pro vesion:
- Drag and Drop Interface: Easily move files and folders around with a simple drag and drop, making organizing your media a breeze.
- Organize Pages, Posts, & Custom Post Types: Not just for media files, FileBird Pro lets you categorize your posts, pages, and even custom post types like products and events.
- Folder Themes: The folder tree design in FileBird Pro is a standout feature for me, combining functionality with modern aesthetics
- New File Counter: Keep track of new uploads easily, with counts per folder or including nested folders.
- Folder Tree with Top-Notch Design: Enjoy a well-designed interface with modern icons, buttons, and draggable elements.
Easy for Beginners
FileBird is really user-friendly, so even if you’re new to WordPress, you won’t have trouble using it.
The interface is simple and straightforward, and you won’t need any special skills to start organizing your media files.
Moving and Keeping Backups Made Easy
If you ever need to move your media files to another website or want to keep a backup, FileBird makes it easy. You can export your whole folder setup with a click, which is a huge time-saver.
Step-by-Step Guide to Install the FileBird Plugin in WordPress
Installing the FileBird plugin is a straightforward process. Here’s a step-by-step guide to help you get started:
Step 1: Log In to Your WordPress Dashboard
Start by logging into your WordPress website. Enter your username and password to access the dashboard.
Step 2: Access the Plugins Section
On the left-hand side of your dashboard, you’ll find a menu. Click on “Plugins”.
This will take you to the Plugins page where you can manage all your WordPress plugins.
Step 3: Add New Plugin
At the top of the Plugins page, you’ll see an “Add New” button.
Click on this to start the process of adding a new plugin to your website.
Step 4: Search for FileBird

In the Add Plugins page, you’ll find a search box, usually located in the top right corner.
Type “FileBird” into the search box and press Enter.
Step 5: Install FileBird
Once you’ve found the FileBird plugin in the search results, you’ll see an “Install Now” button next to it. Click this button to begin the installation process.
The button will change to “Installing…” as the plugin installs.
Step 6: Activate the Plugin
After the installation is complete, the “Install Now” button will change to an “Activate” button. Click on it to activate FileBird on your WordPress site.
Step 7: Configure FileBird (Optional)

Once activated, you can access FileBird’s settings to configure it according to your needs.
You can find FileBird under the “Media” section in your WordPress dashboard or sometimes directly on the dashboard menu.
Step 8: Start Using FileBird

With FileBird activated and set up, you can start using it to organize your media files.
Go to your Media Library, and you’ll see options to create new folders and organize your files as you wish.
Optional Step 9: Upgrade to FileBird Pro (Optional)
If you want additional features offered by FileBird Pro, you can upgrade by purchasing the Pro version. Follow the instructions provided on the FileBird website or within the plugin to upgrade.
That’s it! You’ve successfully installed and activated the FileBird plugin on your WordPress site. You can now enjoy a more organized and efficient media library.
Closing Thoughts
FileBird has revolutionized how I handle media files in WordPress. It’s not just a plugin; it’s a fundamental change in managing your site’s media.
If you’re struggling with a cluttered media library, FileBird might just be the solution you’re looking for.