How To Start a Blog on WordPress (Ultimate Guide In 5 Easy To Follow Steps)

Hello there! Are you wondering how to start a blog on WordPress? Then you are in the right place!
If it’s your very first blog chances are that you are feeling excited and terrified at the same time. And that’s normal, especially not a tech-savvy user.
Good news is that you have nothing to worry about. WordPress was created to make blogging accessible to everyone. Just so you can focus on writing your content and not on having technical knowledge.
This is exactly the reason why we decided to create this comprehensive, beginner-friendly guide. Just so you can quickly get up and running with self-hosted WordPress installation and turn your ideas into articles in a blink of an eye.
Table of Contents
- How to Start a Blog on Wordpress: List of things we will cover
- Step 1: Picking hosting and domain name
- Step 2: Installing WordPress software
- Step 3: Pick and Install Your WordPress theme
- Step 4: Writing Your first post
- Step 5: Extending your blog functionality with WordPress plugins
- What to do after your blog is published?
- FAQ about How to Start Blog With Wordpress
How to Start a Blog on Wordpress: List of things we will cover
As we already mentioned we can to keep this guide simple and beginner-friendly. Just so everyone can enjoy it. Here are 5 steps that we will cover step-by-step:
- Sign up for web hosting (Bluehost is what we recommend as the best place to start a blog).
- Install WordPress software
- Pick and Install Your WordPress theme
- Write your first post (with a new Gutenberg editor!)
- Extend your blog functionality (installing must-have plugins)
Remember: You are not required to have any technical knowledge and you should set up a blog with ease if you follow our instructions. But if you are stuck on any step, please feel free to contact us and we will do our best to help you with setting up your own blog.
Step 1: Picking Hosting & Domain Name
Starting a WordPress blog requires two things: a hosting and a domain. Web hosting provides you with space on the internet for your blog. A domain name is an address that you type in the browser’s address bar (ie humblethemes.com)
There is a countless number of WordPress hosts, so how do you know which one you should select? That’s a good question. In our opinion the one that gives you performance and high quality. One that keeps the prices reasonable at the same time. This is why (as WordPress developers, users and core contributors) we recommend Bluehost to each WordPress blogger.
Note: Here at Humble Themes we believe in transparency. If you sign up with Bluehost using an affiliate link that we provided, we will get a small commission. You shouldn’t be worried about it though as you will still pay regular price. So be assured that there’s no extra cost on your part. We would get a commission by recommending any other hosting provider. We wanted to let you know that we recommend products that we would use personally and that have a quality that we can trust.
Here are only a few reasons why Bluehost is the right decision for you:
- $3.95 per month is a really good and affordable price.
- You get a free domain when you sign up (average price for registering a domain is $10-$20)
- You get a 50% discount coupon on our Premium WordPress Themes.
- You get high-quality hosting recommended by WordPress itself
Getting started with Bluehost hosting
Let’s go through this process together, shall we?
Open Bluehost website in a new window. Once you do so you need to click on the green ‘Get started’ button.

You will be redirected to a place where you can select your plan. We recommend the “Basic” plan for the beginning. It’s the best option to start your blogging journey.
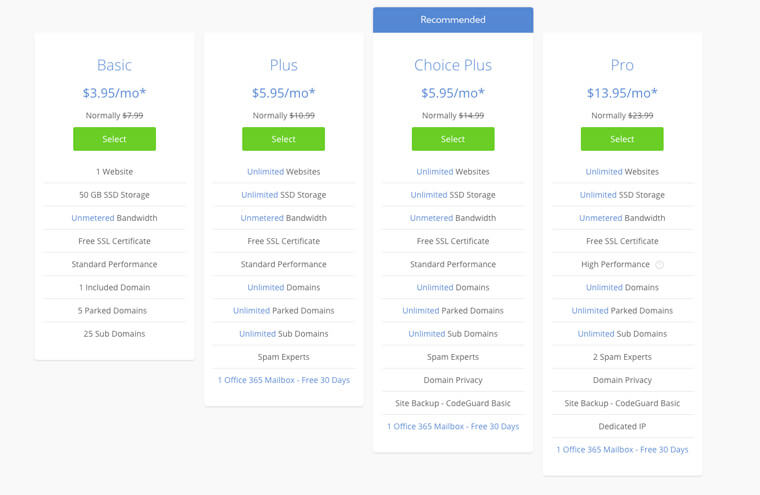
After you do so you will be asked to create a new domain for your new blog. If you don’t have a name yet, you can always do it later.
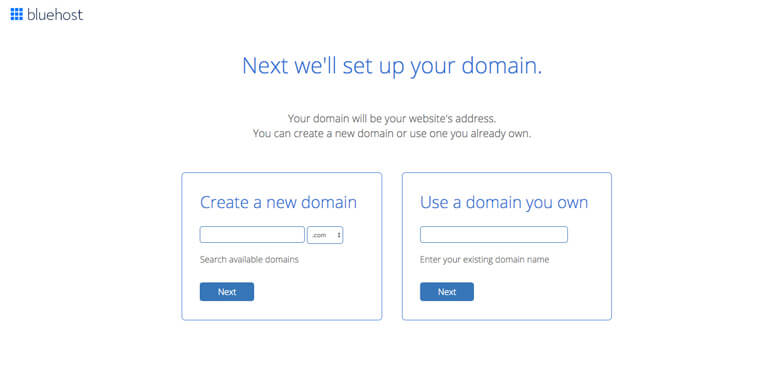
Type your new blog name and go to the next step. On the last page you will be asked to provide your account information:
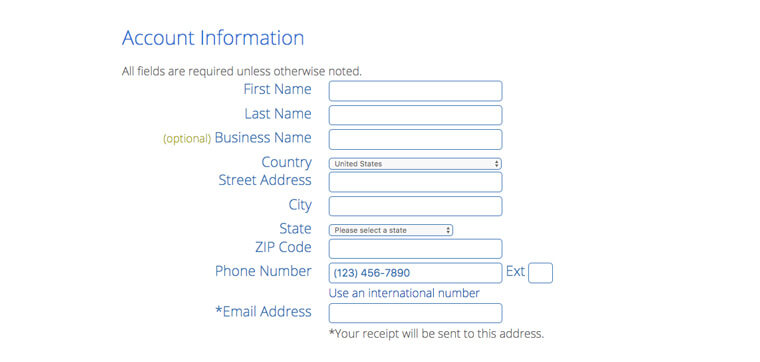
Once you scroll down you will see an option to select your account plan. We recommend selecting 36 months plan as it’s the best value for money.
If you scroll a bit further down you will see an option to select extra packages. Since some of them are checked by default, they are not essentials. We don’t recommend buying them right away. Remember that if at some point you will need them you can always buy them at a later stage.
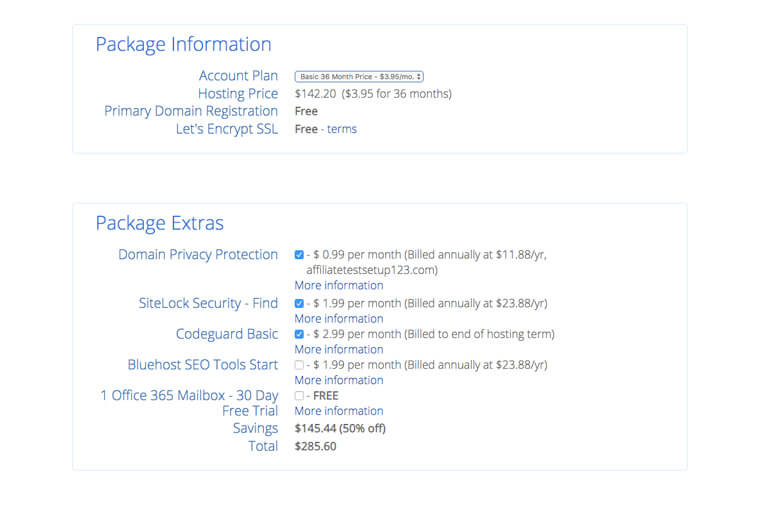
The last step is providing your billing information. Completing this step will redirect you to the account creation page:
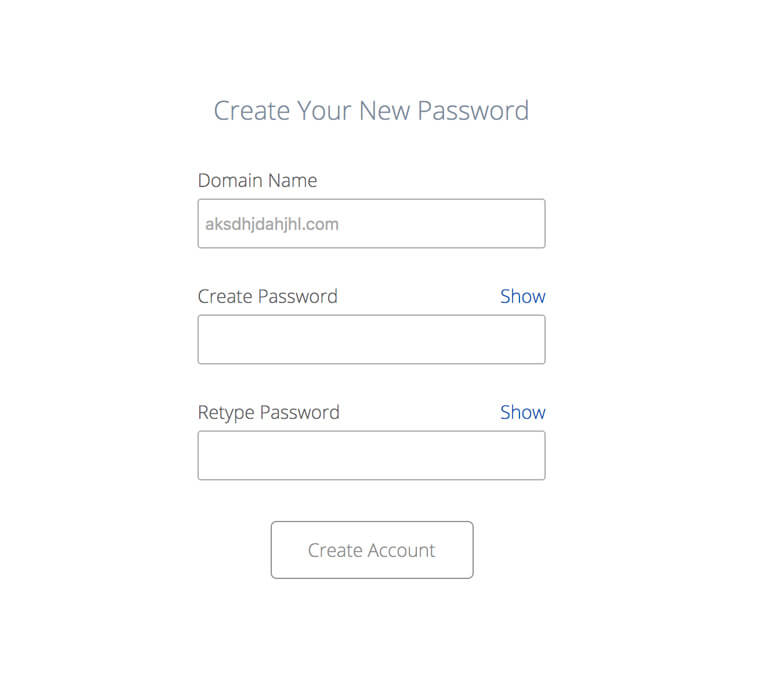
Awesome work! You are ready to log in to your account:


Step 2: Installing WordPress software
If you followed all the instructions now you should be happy hosting owner. Well done!
Our next step is about installing WordPress software. It may seem hard if you haven’t done it before, but actually creating a blog with WordPress is very simple and quick. Let’s just do so.
Select ‘My Sites’ in the left side menu and click ‘Create site’ on the right-hand side:
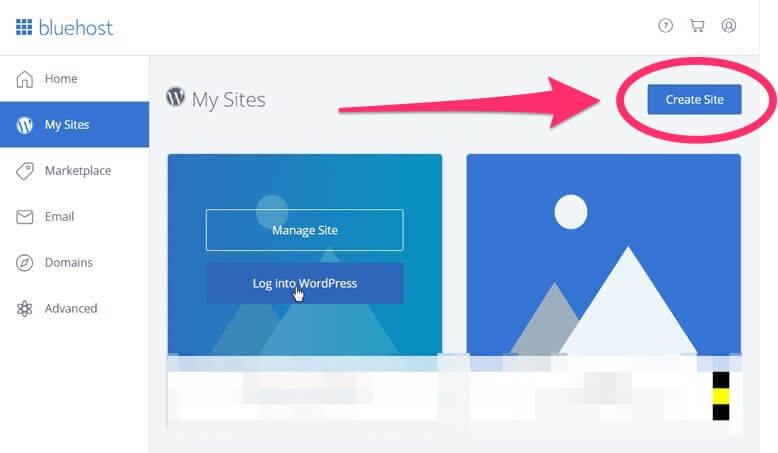
Provide essential information for your blog:
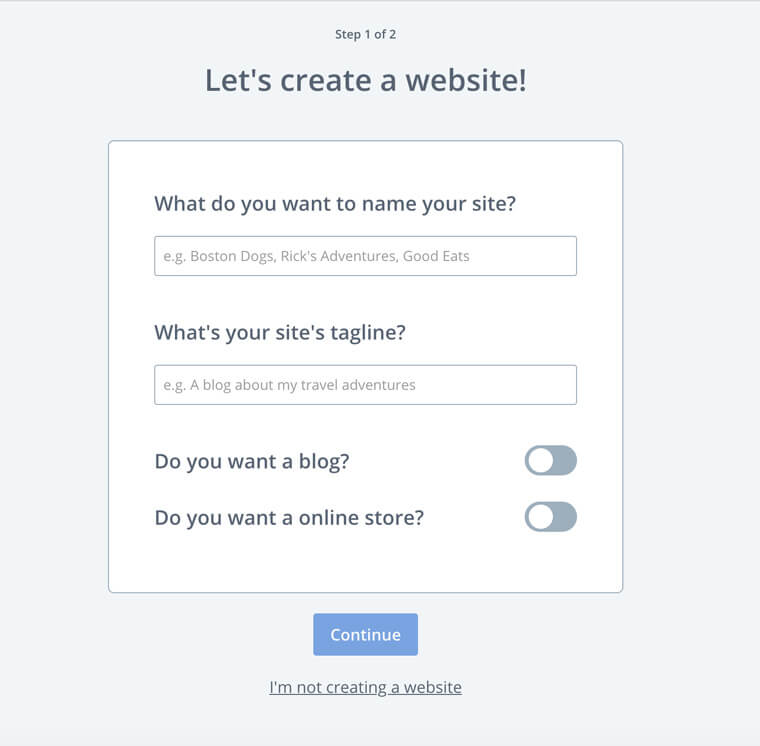
Provide more information about your site you it can be optimized by Bluehost:

After you do so you will see a screen with an option to select a theme. It’s likely that you haven’t decided on the theme yet and that’s fine. You can stick to default WordPress theme for now and change the theme later. Actually we will focus on installing and selecting WordPress themes in the next chapter. Ready?
Step 3: Pick and Install Your WordPress theme
What is a WordPress theme?
WordPress theme changes the design of your website. Theme handles the visual layer of your website. It’s what your users see when they are reading your blog. By changing a theme, you also modify your website layout.
Where to find WordPress themes?
We recommend starting looking for WordPress themes in the official WordPress theme repository. Reason for this is simple and pragmatic. It’s an official repository. Themes that are already there have to comply with the highest WordPress standards. They are safe, secure and you can trust the quality they offer.
Themes that you can buy on various theme markets don’t always have their quality checked. Very often even though the design is nice the code quality is not the best. You may not feel it at first, but once your blog grows you will be affected by this fact more and more.
PRO TIP: Something many people don’t think about it right away: Well-coded website should be available to everyone. Around 18-20% of internet users suffer a different kind of disabilities. That means that if your site is not accessible you risk to loose up to 20% of your traffic.
By picking an accessible theme you can be sure that you have one of the best themes on the market. It not only will boost your SEO but also give an advantage over your competition. Probably everyone who was wondering how to start blog spent quite a lot of time on picking the right theme. We recommend you to make the decision on your own. However, this is a list of our 3 most favourite, accessible themes from the WordPress.org repository (all links open in new tab):

Salzburg is a minimal and elegant blogging theme. Simple, clean and powerful at the same time. Provides you with fast loading speed, clean code and options that you need to customize your blog.

Sanse is a super fast theme where your content is shining brighter than ever.

Koji is a clean and lightweight theme for bloggers.
How to Install WordPress Theme
We already wrote a really detailed article on How to Install Theme in WordPress, but here’s a shorter version:
- In your WordPress dashboard go to Themes > Appearance > Add new
- On the next screen, you will see all the WordPress themes that are available in the repository. You can use filters for refining your search or put the theme name in the right top corner. Once you decided on the theme click ‘Install’
- Once the theme is installed you can activate it.
- Now you can customize your theme by clicking the Customize link under the Appearance menu.

Step 4: Writing your first post
Let’s face it. You won’t learn how to start a blog without writing your very first article.
To write a blog post:
- Click on Posts in the left side menu
- Click Add New

This will launch the WordPress block-based editor called Gutenberg. Each element you will add to your page is a block. Gutenberg you plenty of flexibility. It allows you to create beautiful and unique layouts for your articles. You definitely should familiarize yourself with the blocks. Give yourself some time to play around:

Once you are done with your post content you can take a look and the right-hand side menu. It’s where you add more information about the post. The most important ones will be the ‘featured image’ and ‘categories’.
- Featured image: also known as a thumbnail. It’s a WordPress feature that allows you to select an image that will be a visual representation of your post.
- Category: it is a default taxonomy in WordPress. You can use categories to sort your posts into certain groups that are related to each other. To make it easier to visualise, think of categories in a Newspaper. You can name categories like Sport, Weather, Politics, Economy and so on.
Once your post is ready, click on the ‘Publish’ button in the top-right corner.
Step 5: Extending your blog functionality with WordPress plugins
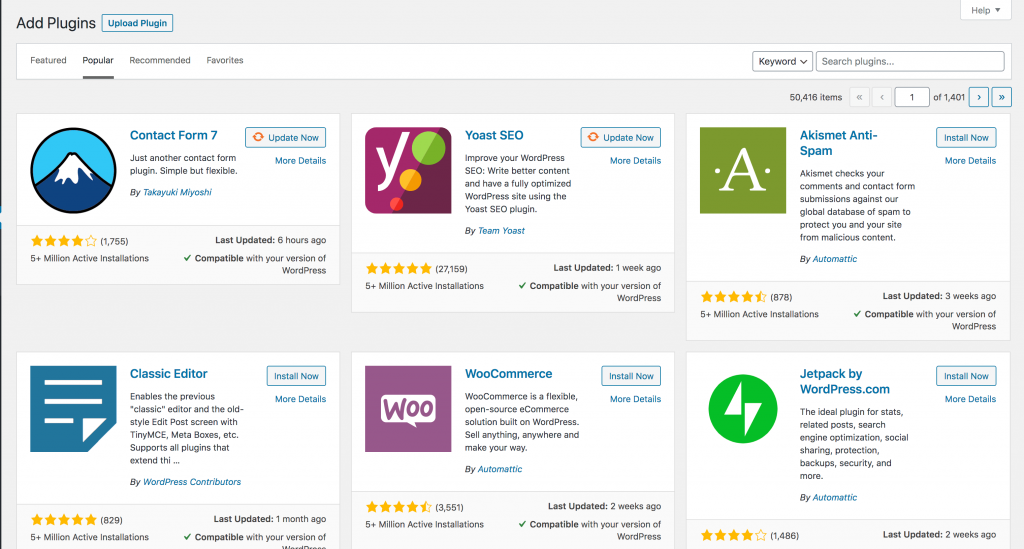
Now, when you know how to create a WordPress blog it’s time to add some extra features. You can do so with installing ‘add-ons. Those addons in WordPress naming convention exist as ‘Plugins’.
This is what makes WordPress unique. You can extend WordPress functionality as you like. Plugins do many things. They may add some extra features like galleries, contact forms, newsletters etc.
In this chapter, we will cover how you can install a plugin and introduce you to some most popular ones.
Where to find WordPress plugins?
In this matter, plugins are very like themes. The best place to look for plugins is the official WordPress repository (which now has over 55000 plugins!). By using a plugin from this source you can make sure that it’s the highest quality.
How to Install WordPress plugins?
In a nutshell:
- Go to Plugins menu item in the sidebar
- Click on Add new
- Browse the plugin repository or search it by name and click Install now
- If you want to install a premium plugin, click on the ‘upload plugin’ button and upload the zip folder.
Please remember to activate your plugin right after it’s installed.
Must have plugins for WordPress
- Google Analytics for WordPress by MonsterInsights
- Yoast SEO (for SEO and search engine visibility)
- Contact Form 7 (for adding a contact forms to your page)
- UpdraftPlus WordPress Backup Plugin (to do backups of your database… just in case)
- TinyPNG (to optimise your images)
What to do after your blog is published?
Ok, so we covered quite a lot here. You managed to create a WordPress blog and change its layout by installing own theme. You published your very first post. You also added some functionality by installing some plugins. Congratulations! Really well done!
Now, when you already know how to start a blog on WordPress what should be your next step? You should focus on two things:
- Promoting your blog: you definitely should start with telling your friends about it and promoting it in social media. Social media is probably the best way to get traffic quickly. Think about involving SEO in your blog posts too. This will allow you to get more serious traffic longer-term.
- Making Money on your blog. Monetising your traffic is definitely something you will think about in the near future.
FAQ about How to Start a Blog With WordPress
The whole post is about WordPress. Can I create a blog without WordPress?
Absolutely, there is plenty of platforms out there that will allow you to create your very own blog. WordPress is just the best solution that gives you flexibility and a possibility to own the content.
I like the idea, but can I have a blog on WordPress.org without hosting?
We are sorry but it’s not possible. Think about hosting as it was your hard drive for the internet. Every single site needs hosting.
Can I use Google Adsense right after starting a WordPress blog?
Absolutely, you can have Google Adsense installed on your blog even if you have only one post published.
Does creating a blog with WordPress require any design skills?
Definitely not, your theme is responsible for the layout, your role is just to write content.
Wow, we are really happy to see that you got that far. Well done to you!